
Upcycle a matcha tea tin into a mini tea house

This post contains affiliate links, which means Steeped Dreams earns a small commission if you purchase with these links or discount codes (at no cost to you). Please know all opinions in reviews on Steeped Dreams are genuine and not influenced by affiliate partnerships.
I save every tea tin that comes through my home with the hope that it will one day serve a new purpose. Matcha tins are uniquely small, flat, and cylindrical so their use for storing office supply or planting succulents is limited. After taking a look at my growing empty matcha tin collection in the back of a closet, I gave some thought to what their new lives could look like.
Their shallow depth would be perfect to house a miniature tea house display! And thus I grabbed random art supply from around the house and went to work. You can set this miniature tea house out on a shelf to enjoy or add a magnet to the back to decorate your fridge.
Getting set up
A long-term theme I’d like to follow for my empty tea tins is using each tea’s origins as the inspiration behind the miniature display. As such, I landed on building a Japanese tea house for the matcha tin and consulted a few pictures to gather some elements I’d want to include.

You can break down your tea house design into a few elements.
What to include in the design:
Tea set with a kyusu
Table and floor cushions
Shoji doors
Tatami floor mats
Wall decoration
Tools and materials

Before starting this project, I had recently crafted a miniature chocolate shop using a kit, so I already had craft wood glue and hobby tweezers lying on-hand. The only thing I went out to buy was a little pack of polymer clay, making my total upcycle cost for this tea tin about $3 total.
Your list may differ from mine depending on the art supply you have at home already and if you find new ways to improvise.
What you’ll need:
Cleaned, empty matcha tin
X-Acto knife or any hobby knife to cut wood
Hobby tweezers
Wood glue
Wooden popsicle sticks (mine were mini)
Paint suitable for wood
Detail paint brush
White polymer clay (any color will do, as you can paint it)
Printer paper (for the shoji door and wall scroll)
Pencil
Toaster oven (to bake the clay)
How to make a mini tea house in a matcha tin
The entire process to upcycle my matcha tin into an architectural marvel took me around two weeks of evening art sessions—clocking in at about 15 hours total. The bulk of time was eaten up by sawing popsicle sticks, which might go much faster if you have a better cutting method than using an X-Acto knife!
Step 1: Create the structure


To work around the tin’s round shape, start by creating a horizontal platform to serve as the tea house’s floor. Line up popsicle sticks side-by-side after trimming the round edges with a hobby knife so you’re left with a rectangle shape. If your tea tin’s lid sits a bit on the inside like mine did, leave a bit of clearance so that the rectangular floor doesn’t prevent the lid from closing all the way.
Once you’re happy with where it sits in the tin, attach the popsicle sticks to each other with wood glue to form a single piece.
Make sure it can be easily taken in and out of tin until you’re ready to glue it in, by measuring the width to be a bit smaller than the widest point of the tin (diameter).
Step 2: Complete the floor and make the tea table

At this point, the floor is a floating platform. So to create a bit more of a realistic building shape within the round tin, bring the floor down to cover the bottom gap.
This requires a bit more precision in cutting out the rounded shape in another row of popsicle sticks. Before cutting, you can line them up to get an idea of how many sticks you’ll need to fill the height, then use a pencil to outline the round edge of the tin to cut.
After gluing those few pieces together, join with the main floor platform at a 90 degree angle. If you want to imitate wood beams at the front of the miniature tea house, now is the time to also cut two additional popsicle sticks into the desired size with rounded edges to fit the tea tin’s edges.
Make a square table with four legs using more wood and glue.
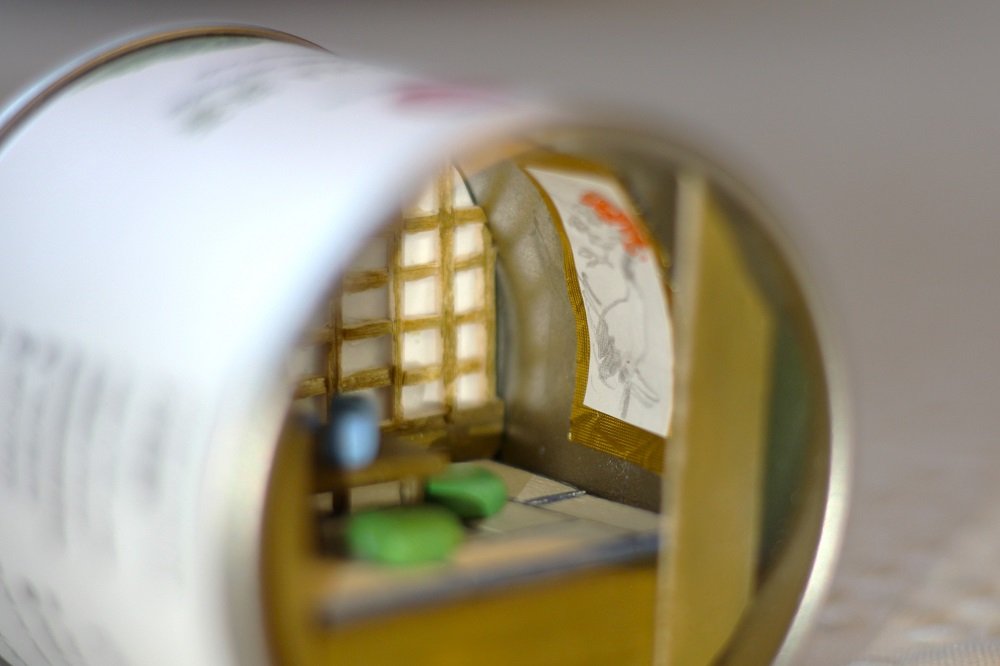
Step 3: Shoji door backdrop

The next step take an infinite amount of patience, stable hands, and attention to detail. It’s time to cut some more popsicle sticks into a shoji door! Shoji are iconic Japanese sliding doors traditionally made of rice paper and a wooden lattice.
While my version leaves a lot to be desired in terms of workmanship, I think it gets the inspiration across okay.
Trace the outline of the back of the matcha tin above the floor onto a piece of paper. This serves as a stencil for the shape you need, as well as the rice paper itself. You can glue each tiny piece of wood directly onto the paper.
Use a thicker piece of wood on the top and bottom to start, then start filling in the lattice with tiny cuts of wood. Use tweezers to position the smaller pieces as you glue them down.
Step 4: Tatami mat and clay tea set


To tie together the whole Japanese tea house motif, cover the floor platform with some tatami mats, another quintessential traditional Japanese room touch. These are made with woven natural fibers, but I used more popsicle sticks to mimic a similar design.
The mats take a bit of math and creativity to piece together, as each one needs to be the same size and fit together like a puzzle. I sketched them out first, then trimmed each stick down to size, finishing by gluing them all together.
Moving away from the wood, we now need to make our tea set and floor cushions to go on top of the mats! I originally tried cutting some packaging foam into small cushions, but couldn’t think of a good way to paint them with the right texture. So instead, I bought polymer clay to have more flexibility in what I needed.
Shape the cushions with your fingers into rectangular shapes. The tea set gets a little trickier, so don’t get discouraged if you need to remake the kyusu and tea cups a few times.
Bake the clay according to package instructions to harden.
Step 5: Paint everything


The most fun and least stressful part of making your mini tea house in a matcha tin is adding a splash of color and seeing the details come alive.
I used artist-grade acrylic paint meant for a canvas because I already had some lying around, but any type of craft paint will likely do. The tweezers will help hold the smaller clay items while painting.
To make the tatami mats pop, I’d recommend painting the outline of each individual mat in a dark color like navy or forest green.
At this point you can also add little wall surprises like a paper wall scroll or other decorations. The wooden beams will hide the walls initially, so it’s a cute hidden touch when taking a closer look inside the tea house.
Step 6: Putting it all together

Unless you want your tea house to look like an earthquake struck each time you open it, the last step is gluing it all down. Use tweezers to position everything in place, and wait until each element dries before putting in the next one in case things shift around.
And there you have it!
Use your upcycled tea tin as a fridge magnet or a shelf decoration. If you’re a matcha fiend with too many empty tins collecting dust, you can try making all sorts of different tea rooms, each with a unique color combination and spin.


more blogs to sip on…
![[Review] Firebelly Tea - Sleekly designed functional blends](https://images.squarespace-cdn.com/content/v1/6008e4b84dfdb80938cd0442/cdd4b217-3704-40dd-b11e-bc18ff413610/firebelly+tea+review.JPG)
![[Review] Harney & Sons - Paris tea and two similar blends](https://images.squarespace-cdn.com/content/v1/6008e4b84dfdb80938cd0442/5cf20e59-ce49-4fba-b9dc-16f1f43a1349/harney+tea+with+plant.JPG)